

What’s the big idea?
The big idea is to mark where to dig the foundation. Getting there was more of a journey than I thought. There are many ways to go about marking where to dig. Being a mathematician, I’m a little uptight about getting things lined up just right, so I started at the road- I wanted the house to line up parallel to the road. You can read more about the steps here. I bought a “David White” builder’s level from a retired contractor who lives in a huge house that he “built” himself near the water tower on Airport Road.
Let me comment on the word “built”: I put built in quotes because the word is subjective. Anciently, scribes wrote for the Pharaoh. They wrote exactly what he said, down to the “I, Tutankhamen wrote this decree”. Even though King Tut didn’t actually write it, the scribe wrote what the King said, and it was as if King Tut himself wrote it. Similarly, many people who say they built their house mean that they directed the building of their house. In my conversation with the contractor I bought my level from, I discovered that when he said the word “built”, he actually meant that he directed the building of his house. He did add trim and built the custom hood for his kitchen range. But he didn’t lay the bricks. Or frame the walls. Or shingle the roof. Or, or, or.
But everyone says “yeah, I built this house <wink, wink>.” So, what’s the word you use when you literally mean “I built this house”? I don’t know. But so far, I’ve cut down every tree. And my wife and I peeled every single one of the logs. And we both went through about 30 iterations of floor plans before we committed one of them to paper. And then I modified the entire interior floor plan from the LHBA plans I bought with the design we came up with on paper. I used the LHBA roof, foundation, and joists. But my wife designed the interior walls on both floors.
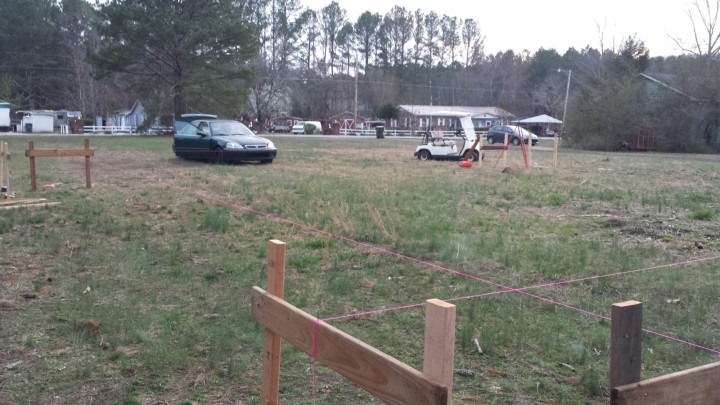
And now, under supervision of the neighbor, I’ve laid out stakes for the foundation.
House location:
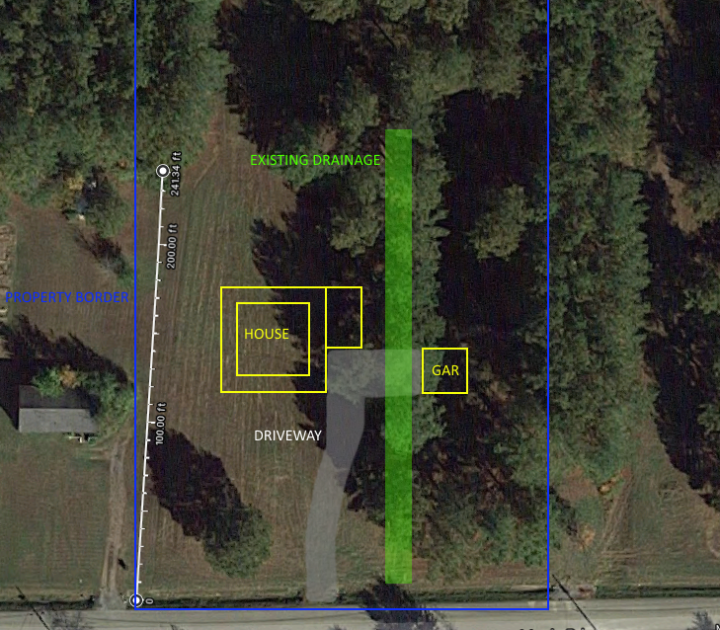
My wife and I drove out to the property on a sunny afternoon. We haven’t nailed down the exact location of the driveway (gray area), but it will probably be close to the picture above. The blue box is the property outline. The large yellow double box on the left is the house and porch footprint, while the single yellow box on the right is the garage/shop. The other yellow rectangle is the carport. We placed the house on the high point of the property. The 500 year flood zone ends just on the left border of our property- we are not in a flood zone, according to FEMA and the county. But there’s this little ditch (in green) about 1 foot deep- maybe 2 in places. I wanted to avoid putting the house too close to the neighbor, while my wife wanted to avoid putting it over the ditch. So, we compromised: it’s as close to the ditch as we can get without being in the ditch. We may have to fill in the ditch with drainage and gravel, but that will come later.
The point of all of that was to find the S.E. corner of the house, and then lay out the rest of the house from that point.
Too many chiefs, not enough Indians
My neighbor is a retired surveyor. He wanted to help, so I let him. We started sighting in the corners, and then his grandson came over to help. The neighbor had a stroke a few years ago, so sometimes he can’t say the word he’s thinking of, but we’ve worked out a system where I guess what word he’s searching for. All three of us spent time sighting each corner, but we couldn’t get it square- one corner seemed to be off by 4-6 inches. Not good when you have to line up your 1/2″ rebar on a perfectly straight line 40 feet long. The surveyor neighbor couldn’t emphasize that we needed to be level vertically AND horizontally with our ruler. And I had trouble communicating that the pier foundation only needed to be 12″ deep for code and that I didn’t care how tall it was from the ground (48″ tall piers – 12″= 3 foot tall piers, from the ground, at the lowest point. The high point is only 1 foot difference. So as long as I have at least 18″ crawl space, I’m meeting code. (I have 2 foot of clearance minimum, so I’m fine.)). I wanted to sight from the low point so I could set the max pier height (based on the 12″ frostline depth) at 3′, but most surveyors sight from the high point. So there we were, trying to dangle a piece of measuring tape from the tripod at the high point, guessing what height it might be at the low point.
Meanwhile, I forgot to tell his grandson how exact the angle had to be (1/2 degree difference @ 40 feet = 4 inches variance). So all of us were taking turns doing each part- holding the stick, measuring the vertical drop, sighting the corners. There was a lot of walking and confusion going on. I learned a lot, but the communication was the problem. The neighbor thought it was the scope. I thought it was one of the angles, or maybe the uneven ground.
Needless to say, I was looking forward to checking my work on my own, which I finally did on Friday. I set up the level, and triple checked every measurement.
…And the culprit was….
The level was doing something weird with the set screw- you had to loosen a screw to adjust the scope, and I wasn’t doing that. But in the end, the scope was fine- it was one of the angles. The level wasn’t set perfectly at 45 degrees for the far corner, so that corner was off by about 3 inches. I adjusted the string, and rechecked every measurement. I checked each corner using a 3-4-5 triangle (measure 30″ and 40″ from a corner and make a mark on each leg. Then, place the ruler from one mark to the other, and the diagonal length – the hypotenuse- should be 50″). Just as the sun was going down, I finished the last 3-4-5 triangle on one of the corners, and measured the length of the side at 39′-11 1/2″- just 1/2″ shy of 40 feet. I’m ok with that.
When in doubt, look at the plan
Next, staking the piers- I tied string across the whole layout to mark the center of each pier. But the plans do not intersect the center of the piers at every junction. I spent a lot of time untying string and adjusting stakes. I should have looked more carefully at the plans. There are 7 piers on the front and the back, and 5 along each side. Then 6 in the center, and one big one in the middle- for a total of 31 piers. The rebar does not fit in the center of each pier- it fits in the center of the log or 8″ from the edge- whichever is larger. So the piers have tops that are 24 inches long- this means that the rebar sits 8″ from the edge of the pier, or 4″ from the edge of the outside string line (the 40×40 outline). It all would have made sense if I studied the plans, which I finally did.
I put a stake at the intended center of each pier, and then painted a 3′ square box around each stake for the excavator to dig. I will hand level the holes after they are dug. Then I’ll place the concrete forms in the holes, re-place the string, and center the forms. Once the forms are centered, I’ll fill in the holes in preparation for the concrete so the forms don’t “float up” when it’s poured. Finally, I’ll dig up the forms and remove the plywood.
Yes, I’m now officially behind schedule
Cash is also an issue, but I’m going to have some faith and move forward into the unknown. I still have a plan to get the roof on by the end of summer. Very ambitious for one guy, but still do-able. I’m going to need some help setting my lifting poles. I’m already thinking about the mechanics of getting them set- here’s a video (one of the only ones I could find- most poles are set by equipment, but cash is tight, so I’m going to try doing it manually).
